
Welcome to Modern Agriculture!

In this article, I will tell you all that is needed to know about the cycling process of your shrimp tank, different types of bacteria and how they work. You will get a full guide of what and when you need to do to succeed.
Let’s start from the basics.
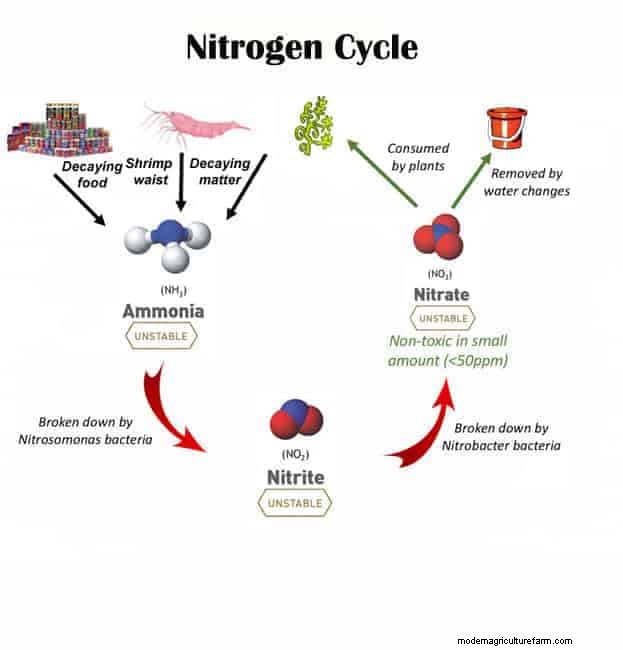
Through urination or defecation, all living things isolate and expel waste matter generated during metabolism in the form of ammonia. Unlike in the open-river where the ammonia can easily be washed away, ammonia becomes a big menace in closed-environment like an aquarium where there is a restricted movement of the water. Thus, creating a big problem for the aquarists and their inhabitants like shrimp and fish.
As luck would have it, and as part of the nitrogen cycle, the presence of a naturally occurring bacterium – Nitrosomonas sp. – will help degrade the ammonia to nitrite. Although this end product – nitrite – is toxic, another bacterium, Nitrospira sp., will further downgrade the nitrite to nitrate which is removed by the routine changing of the water.
But in the case of a new aquarium, the presence of these bacteria is nil. In this way, when shrimp (or fish) are exposed to this type of environment simply means exposing them to high levels of ammonia and nitrite. That will be the case until new colonies form and multiply sufficiently to put up with the waste produced by the shrimp. This process is called a ‘cycle’.
You can read more about “Nitrates in Shrimp Tank. How to Lower them” right here.
In as much as we do not want to expose our shrimp to ammonia or nitrite, we still need the ammonia to form colonies that will deal with the ammonia produced by the shrimp. But the big question is: how do we make use of what we do not want?
Very much different from the common belief that cycling means leaving your aquarium to stand for a week or two. If there is no source of ammonia to feed the bacteria, then it is not cycling. Rather than practicing the former, there are other ways to add ammonia to an aquarium and build up colonies before the shrimp are introduced.
Tip: of course, it will always be better to buy one designed for aquariums. Because you will know the dosage. In case you do not know the dose – use 3 or 4 drops per gallon (1 drop per liter) and no more.
Although Nitrosomonas sp. and Nitrospira sp. are naturally occurring and will colonize the aquarium in due course, there are still other ways to catalyze the process.
This piece of writing will revolve around the fishless cycle because using fish is damaging and I personally do not support this method.
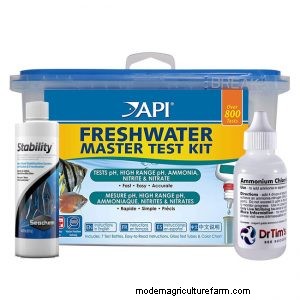 To do this, you will need to make three purchases – the first is a bottle of pure ammonia, then live nitrifying bacteria and the test kits for ammonia, nitrite, nitrate, and pH. Liquid kits give more accurate results and are more durable than test strips. Purchasing a master pack that contains all the necessary tests is more cost-effective than purchasing the individual kit.
Note: If you have only a solution of ammonia and do not know, how much you need. I give some examples of how to calculate below or you can find an online calculator to help you.
Doing fish and cycling without test kits is like driving in the dark without lights you do not know where you are going and you might have big problems.
The next step is to set up the aquarium and raise the water temperature to 80°F/27°C. Do not forget to dechlorinate the water first, because tap water contains chlorine or chloramine that can kill the bacteria (your target), and the purpose of the cycle is to grow bacteria. During the cycle, leave the filter running with the outlet rippling the surface, as this will help the colonies to grow by increasing the oxygen content of the water.
Preferably, you should fix a time to conduct the test each day because it is recommended to allow a 24-hours’ time frame before conducting another test.
Make sure to:
– turn off the protein skimmer
– turn off the UV
– remove the filter sock
They must be turned off (removed) for 48 hours after adding live nitrifying bacteria.
All those things will either trap or kill the nitrifying bacteria, which is not what you need.
 1. Use and dechlorinator to remove chlorine and chloramines from the water, because it can harm live nitrifying bacteria.
2. Wait an hour or two.
3. Add the nitrifying bacteria to your tank (min 10ml per 10 gallons). It is going to be cloudy and that is OK.
4. Add the ammonium chloride 4 drops per 1 gallon (one drop per gallon equals two parts per million ammonia). In this article, I am referring to DrTim’s product.
5. Wait 24 hours and test your ammonia and nitrite level.
Important: Do not worry if your test kit reads zero ammonia! Why? Because you have added the live nitrifying bacteria. People think that because they added ammonia 24 hours ago that they should be getting a reading in their ammonia test kit. That is not correct.
6. Add the ammonium chloride (4 drops per 1 gallon)
At this stage, the bacteria are converting the ammonia to nitrite. What is happening with the nitrite? The nitrite bacteria work slower and it takes more time. So you will probably see a little bit of nitrite.

7. Wait 48 hours and test your ammonia and nitrite levels every day.
Note: If the ammonia or nitrite values are over 5 ppm, then skip the next addition (day 6) of ammonia drops. Maybe the bacteria are taking a little longer because everybody’s aquarium is different.
8. Add the ammonium chloride (4 drops per 1 gallon)
9. Wait 48 hours and test your ammonia and nitrite levels every day.
Usually, at this point, ammonia and nitrite will be zero or below 0.5. This is OK
10. You can do a water change 10-20% if you have some nitrates.
11. Your aquarium is cycled and you are ready to breed shrimps. However, for safety’s sake, I would wait at least 3-7 days more. Keep checking the water parameters. You need to be absolutely sure that they are stable.
It is, however, recommended that you check the pH level every few days as the bacteria will go dormant if the value falls to low. The fact that you know when the pH is falling will enable you to prevent the bacteria from going dormant. You should also check the kH of the tank first as this is likely to be very low.
Keep away from purchasing ‘pH Up’ products but rather use bicarbonate of soda (found in the home baking aisle of a supermarket) to raise both the pH and kH.
Important: DO NOT add more live nitrifying bacteria. Some people think that you have to feed the bacteria every day. NO, this is wrong. Note Nitrospirasp. is much slower to multiply than Nitrosomonas sp. Therefore, you’ll find that the nitrite stays high for a longer time than the ammonia did. However, once it starts to drop, it drops very quickly. Ammonia should be added carefully to the aquarium so as to achieve a reading of 5 ppm.
Notes:
1. An extreme level of ammonia will kill the bacteria and if the ammonia level is too low, it will slow the cycle. In this way, you should decide the correct amount of ammonia to add. The following calculation can be used as a starting point.
2. There are online calculators that will tell you the correct amount. Bacteria, however, will do best at a pH of 7.8 but there is no need to target this. Anything value over 6.5 is okay.
Tip # 1: If the pH drops below 6.5 perform a 25-30% water change taking the water from near the top of the water column.
Tip # 2: If you want to cycle your tank faster use a heater with an adjustable temperature setting. The warmer the water the faster the bacteria will grow so you can go as high as the heater allows.
I would like to tell you that there is no clear answer as different aquariums cycle at different speed levels. As a recommendation, a time frame between four and eight weeks will do. It is much faster if the bacteria are added at the onset.
This is the best time to plan your ultimate stock, so visit your local shrimp shop to catch sight of what they have in stock, note down what catches your fancy, and then research those species in the Knowledge Base.
The cycle, however, is complete when you have zero readings for both ammonia and nitrite for more than a couple of days in a row. At this moment, when you test for nitrate, it will indicate a very high value. You can do a very large water change (80-90 %) at this point to remove the excess nitrate, and do not forget to dechlorinate the freshwater before adding it. No ammonia should be added once shrimp are present.
Tip: Before adding shrimp, you can also use snails to stabilize the eco-system in the aquarium. You can read more about “Benefits of Snails for a Shrimp Aquarium” right here.
After undergoing the aforementioned steps and recommendations, there should be sufficiently large colonies of the correct bacteria to support. Therefore, you can fully stock afterward. However, always remember that there are no difficult rules regarding the density of the colony size (1-2 shrimp per 1 liter of water (5-10 shrimp per 1 gallon)).

