Revive Your Soil & Reduce Your Environmental Impact
Vermicomposting, or worm composting as it is more commonly known, is the process of using worms to break down discarded food and other organic wastes and convert them into compost and liquid fertilizers. Not only will this process save you money, but it will also downscale your environmental footprint. Vermicompost systems can be purchased online or assembled cheaply by up-cycling materials found around the house or at a local thrift store.
Quick Tip
Avoid fruit flies by covering food scraps with a few inches of bedding and/or freeze food scraps before adding them to your vermicompost bin.
Why Vermicompost?
Save Money
Implementing the three R’s (reducing, reusing, and recycling) into your lifestyle through vermicomposting benefits you financially!
- Avoid “tipping fees” for green waste implemented by many landfill diversion sites.
- Make your own nutrient-packed organic fertilizers for free; purchasing similar nutrient-rich fertilizer costs an average of $50 per 10 pound bag.
Create Nutrient-Packed Fertilizer
Products of your vermicompost can be used horticulturally for the benefit of houseplants and gardens.
- Vermicompost has more nitrogen, phosphorus, potassium, copper, zinc, and iron than farmyard manure.
- Produce useable compost year round, faster than alternative methods.
- Increase moisture and nutrient retention in your soil.
- Lessen crusting and other physical damages common to soils in arid climates.
Improve Your Local Environment
Vermicomposting encompasses all three R’s: reducing, reusing, and recycling.
- Worms will reduce your waste production by reusing food scraps and recycling nutrients. The U.S. generates more than 34 million tons of food waste each year (EPA 2011). Prevent this unnecessary waste from ending up in landfills.
- Save energy typically required for waste removal and transportation.
A Word About Worms
All worms are not created equal! Choosing the right worms for vermicompost can make or break your compost system. It is important to understand the difference between earth worms and composting worms.
Earth Workers vs. Composters
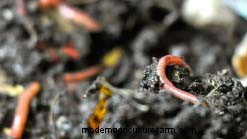
The worms you see most often, crawling on pavement after a long rain or burrowing deep into your garden are known as earth workers, or earth worms. While beneficial in their own way, earth worms are not ideal for composting. Composting worms, such as red wigglers, are a non-native species preferred for composting; they process large amounts of organic waste daily, can handle disturbances and thrive in confinement, whereas earth workers do not.
Did You Know?
The largest earthworm ever found was in South Africa and measured 22 feet from its nose to the tip of its tail.
Red Worms
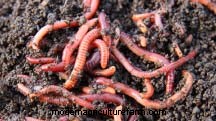
Red Worms...or red wigglers, manure worms, red hybrids, tiger worms, striped worms, etc...
According to Mary Appelhof, worm guru and author of Worms Eat My Garbage (1997), red worms are the most satisfactory worms to use in home vermicomposting.
Tip for Purchasing Compost (Red) Worms:
Know the species and genus name of the desired worm specimen before ordering or visiting a dealer.
Favorable Red Worm varieties:
- Eisenia fetida
- Eisenia andrei
- Lumbricus rubellus
Make a Vermicompost System
Materials Needed
- Container. Get creative! Use old buckets, garbage cans, tool boxes, etc. Rubber and plastic containers are cheap, easy to use, and durable. Wood will eventually be eaten, but will work in a pinch. Be cautious of any chemical treatments containers may have undergone.
- Bedding. An organic substrate: Ideally either newspaper scraps or coconut coir (husk fiber).
- Water. Don’t drown your worms, but keep them moist.
- Worms. Red worms, not earth workers/worms.
- Dirt. A handful or two.
- Food scraps. A handful to start.
Instructions
- To prepare the container, drill holes along the bottoms and sides for ventilation.
- Fill the bin up to half way with an organic substrate (thin strips of shredded newspaper or coconut coir). Sprinkle a handful of dirt on top, and thoroughly moisten. Allow the water to soak in for about a day before adding the worms.
- Add worms and food scraps. Worms are hermaphrotide, so adding just two can be enough to start. Sprinkle your red worms onto the top of the moistened organic substrate; they will burrow down into the bin to get out of the light.
- Feed worms by burying food in a different area of the bin each time. For example, the first time you feed, you may choose the NE corner; the second time, the NW. Continue a pattern of choosing a different spot each time you feed to ensure even distribution of castings.
- Harvesting castings and compost. Generally, it takes 2 to 3 months for a newly developed worm bin to generate a good amount of vermicompost (a combination of castings and compost).
Feeding your Worms: Do’s & Don’ts
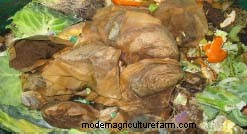
Place the following in a worm bin:
- Shredded paper products
- Fruits and vegetables
- Trimmings
- Grains, beans, or breads (without butter, margarine, or mayonnaise)
- Egg shells
- Fallen leaves
- Tea bags
- Coffee grounds and filters
- Lawn clippings and weeds
Do not place the following in a worm bin:
- Meat products
- Dairy products
- Oily products
- Excessively spicy food scraps
Options to Harvest Compost & Castings
Light Fright
- Shine a bright light on the worms. They will avoid the light and burrow down through the vermicompost.
- Remove the top layers of vermicompost until you see the worms again.
- Repeat. Eventually the worms will congregate at the bottom of the bin. These can then be put into fresh bedding.
Mass Migration
- Move old compost to one side of the bin and fill theempty side with fresh bedding.
- For the next few weeks, bury food waste only in the newly bedded side of the bin.
- The worms will follow the fresh food and migrate to the new bedding. Then you can scoop out the castings (the old compost).Worm tea: Mix castings with water and use as a liquid fertilizer (a worm tea recipe can be found on the next page).
Using Products of Your Worm Bin: Castings & Compost
Worm Castings
Deposits that have moved through a worm’s digestive tract are worm castings. Castings are more homogenous and have a slightly higher salt concentration than regular compost. To achieve a higher concentration of castings in your bin, feed worms smaller amounts, less often.
Worm Compost
A dark mixture of worm castings, organic material, and bedding in varying stages of decomposition is called worm compost. To achieve a higher concentration of compost in your bin, feed your worms larger amounts, more often.
Use for Seed Bedding, Transplanting & Topdressing
- Seed bedding: Mix in with soil in seed rows to give seedlings a boost.
- Transplanting: Mix with soil into a prepared transplant hole.
- Topdressing: Sprinkle around the base of growing plants, not directly touching the plant.
Castings: Use for Potting Soil, Top Dressing, & Liquid Fertilizer
- Potting soil: Mix with other potting materials to decrease salt concentration.
- Top dressing: Put castings around (not directly touching) house plants.
- Worm tea: Mix castings with water and use as a liquid fertilizer (a worm tea recipe can be found on the next page).
How to Make Liquid Fertilizer (Worm Tea)
Insert 1 cup of castings and 1½ tsp. molasses into a 2L soda bottle. Fill the bottle with non-chlorinated water, leaving about an inch of air at the top. Tighten the cap and shake the bottle to aerate the solution. Then remove the cap or pressure will build in the bottle as bacteria grow (bacterial growth is a good thing). To aid in growth, aerate the contents several times a day, remembering to remove the cap again after agitating the bottle. After 24 hours, the entire contents may be used as a liquid fertilizer.
Maintenance: What Do Worms Need?
- Temperature: Worms thrive best at temperatures between 55 and 77 degrees Fahrenheit. Keep your worm bin in a location with an average temperature that resides between these two extremes.
- Moisture and Oxygen: Keep bedding moist, not too wet, not too dry, about as damp as a wrung-out sponge. Fluff bedding often using gardening trowel. Worms are skin breathers and require moisture for oxygen exchange.
- Food: Feed small amounts of food scraps, cut or blended into small pieces, approximately every other day
- Bedding: Additional bedding only needs to be added when you harvest your worm bin for fertilizer.
Escape Attempts
If worms are unhappy, they will let you know. If your worms are attempting to escape their bin, they are not happy. Some common causes of worm escapees are: vibration, excessive or too little moisture, and extreme temperatures.
Smell
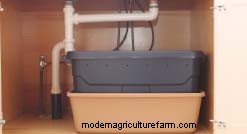
This is a common concern among those interested in vermicomposting. Because you bury the food and worms are voracious eaters, the most common smell described from vermicompost systems is “earthy.” Bins are generally kept with lids (don’t forget to drill holes!) either in a basement, garage, or under the kitchen sink (pictured below). If you have a large enough compost pile, you can possibly keep your system outdoors year-round.
Sources
- Appelhof, M. (1997). Worms Eat My Garbage: How to set up and maintain a worm composting system, (2nd ed.). Flower Press, Kalamazoo, MI.


