
Welcome to Modern Agriculture!

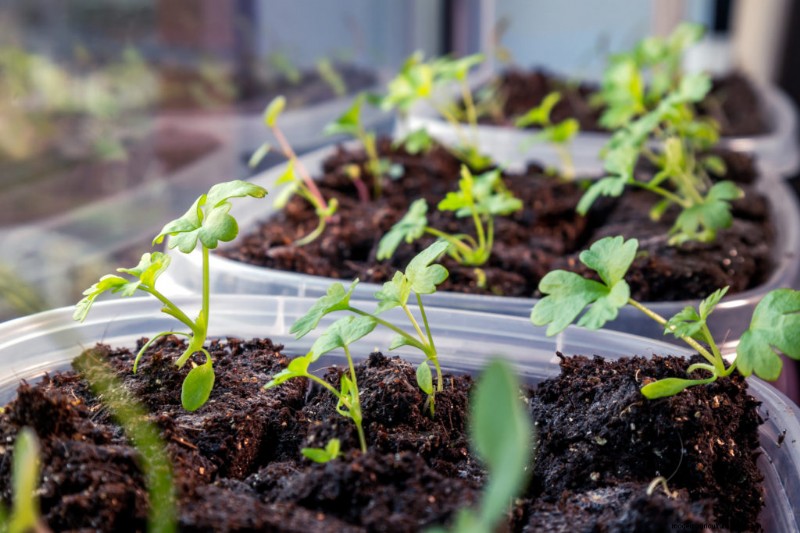
I’ve heard that celery seeds are notoriously difficult to germinate, and sure enough, the very first time I tried, I failed. Not one sprouted celery seed in sight. The following year I changed my method, and I managed to get an impressive germination rate.
But the work doesn’t stop there. Celery seedlings grow slowly and need a lot of attention before they develop into the crispy and watery stalks we all know and love. So in this article, I’m going to show you how to give your celery crop a head start.
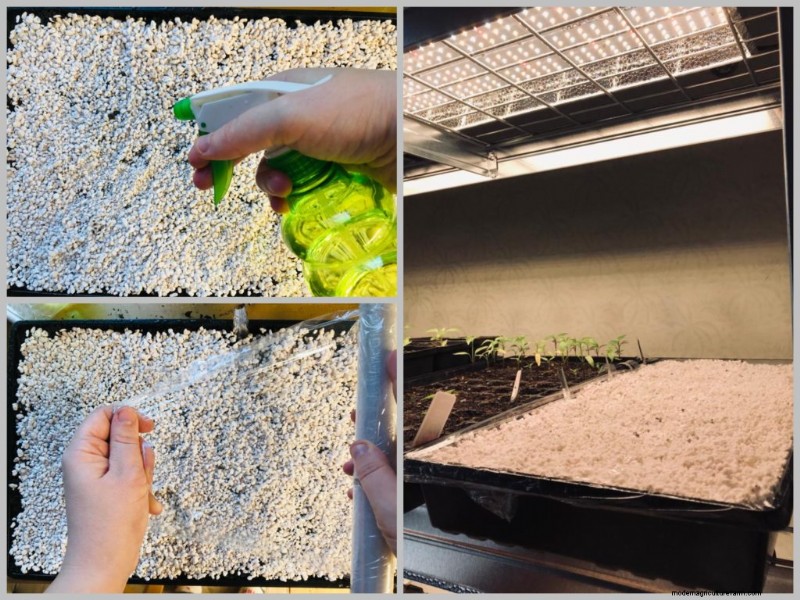
Celery seeds need three things to germinate: a temperature of 70°F, constant moisture, and direct light. To ensure constant humidity use plastic wrap or a dome. Sprinkle the seeds on top of a soil mix like coco coir and leave them exposed or cover with perlite. Place under lights or a windowsill.
That’s all there is to sprouting celery seeds in a nutshell – and it works just as well for celeriac. Now let’s take a closer look to make sure you get all the steps right:
As I mentioned, celery seeds, like most vegetable seeds, love a good mellow room temperature of about 70°F (21°C) to germinate.
Celery can be grown both as a spring crop and a fall crop. It needs about 3 to 4 months to reach maturity and plenty of cool weather. For this reason, the only way to grow celery as an early crop is to start the seeds well before the last frost: 10 to 12 weeks before, to be exact.
That’s right, you should start your celery seeds at around the same time as your peppers and eggplants if you want an early crop because celery grows VERY slowly – it’s a 4-month project from germination to harvest. And the only way to do that is to start them indoors, in a controlled environment.
I don’t know about you, but I find that *constant* moisture is the hardest thing to achieve in gardening indoors, as opposed to raised beds. My containers and module trays either dry out or I overwater – it’s a neverending cycle.
The trick with ensuring constant humidity is to pre-moisten the soil mix, sow your seeds, spray with water and then cover the container with either plastic wrap, a transparent plastic lid or a humidity dome. Anything that traps the moisture in and is see-through does the job.
And then LEAVE IT ALONE. Check the seeds daily for signs of germination, but don’t water too often, unless the surface looks dry. Overwatering is just as bad for tiny seeds like celery.
Celery seeds need light to germinate. That’s the most important fact that new gardeners are often unaware of. Here’s what this means for your method of sowing. You could:
Now that you have your seeds semi-exposed, it’s time to place them under grow lights. Since I use my grow lights for other seedlings as well, I keep them on a 16hrs ON – 8hrs OFF schedule. These are strong lights and help me get sturdy celery seedlings.
Alternatively, you can place your containers on a windowsill, especially if it’s sunny all day long, but you risk getting leggier seedlings. Don’t worry, you can fix this at a later stage.
Celery seeds take anywhere from 2 to 3 weeks to germinate, so BE PATIENT! You’ll see a few sprouts push up from underneath the plastic wrap because not all of them will germinate at the same time. Once half of them have sprouted, remove the wrap, lid or dome and keep misting the soil mix from above until all seeds have germinated.
Once you have tiny seedlings, start watering them from below – but be careful not to overwater. Here’s a useful resource on how to properly water young seedlings.
If your celery seeds take longer than 3 weeks to germinate, it’s either too cold, you’ve allowed the soil surface to dry out, they don’t have access to light, or you have old seeds. As for seed age, celery seedlings can last for up to 5 years, so check your seed pack for the expiration date.
Once the celery seedlings are transplanted to bigger pots, you can keep them indoors for 6 weeks or even more, before weather conditions allow you to plant them outside. This may seem like a lot of time, but they grow so slowly that you won’t be overwhelmed.
Don’t forget to properly harden off your seedlings to avoid transplant shock.
And another thing to keep in mind if you’re growing both celery and celeriac is to keep them separate – because they look absolutely the same.
So there you have it, a thorough, step-by-step guide to germinating your celery seeds and fixing your leggy seedlings. I hope you give celery a try this year – it’s so much better than store-bought. Until next time, happy gardening!

