
Welcome to Modern Agriculture!

Sarah is a homemaker and stay-at-home mom who enjoys writing about motherhood, healthy living, finances, and all things home and garden.
If you are planning on getting chickens or, like me, have already purchased some cute little chicks that are currently sitting in a large container in your garage (gulp), you are going to need an outdoor home for those chickees before you know it.
You might choose to buy a pre-made new or used chicken coop, and can do so for $300 and up, but the cheaper ones are pretty small, so you wouldn't be able to have more than four chickens (and that would be tight!). You could spend more for a larger one, but that kind of defeats the purpose of raising chickens for cheap, organic, super healthy eggs.
Building your own chicken coop can give you more bang for your buck, and it's not as difficult as you might think.
Pre-Made, Store Bought
Easy—can be purchased and set up in a day and you don't have to be super handy to set it up; Attractive looking--great for neighborhoods; Compact—good for small, urban yards; Laying boxes—most come with laying boxes, making collecting the eggs every day much easier
Expensive—expect to pay $300 plus; Small—don't plan on adding more chickens down the road; Limited options
Converted Shed
Easier than DIY—You don't have to be super handy to convert; Converts to a large Walk-in Coop—easier cleaning; Large size—plenty of room for chickens, allowing for more chickens in the future; Can be set up in a day or two; Very inexpensive to convert existing unused shed
Expensive if you must buy the shed; Very few options for converting; Too large—may be a lot of extra space to clean; Does require some construction ability— you must cut out the chicken door, and add ventilation
Used Coop
Cheaper than purchasing a new coop; more flexibility in terms of size and function
You must have a way to get a fully constructed coop home; still may be a large cost; You must be careful that there is nothing wrong with the coop
DIY Coop
Possibly that cheapest option, especially if you have some of the lumber already; allows the most flexibilty in terms of size and function; a fun backyard procect for handy families
Can get expensive quickly, requires some knowledge of construction; takes the most time to construct—think a week or two;
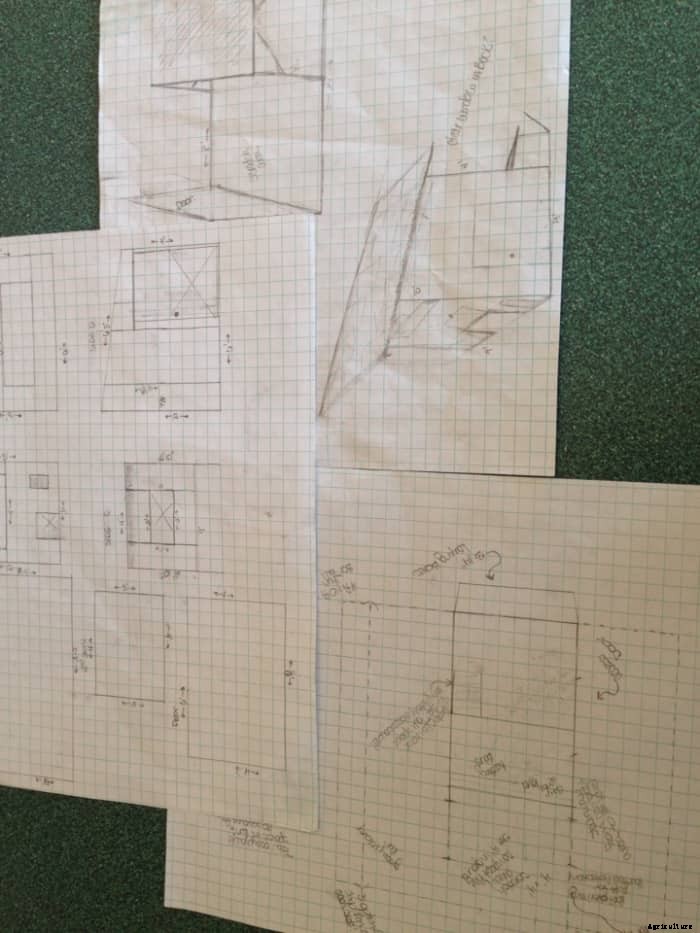
Before you start constructing, you need to get a design mapped out. You could look for free designs online. Backyard Chickens has a huge section of free user-submitted coops and designs. Some have more information on exactly how to build the coop than others, and none that I saw had details like a cut list or parts list. You would need to create a design based off of their pictures.
You could also purchase a design via a book or online site. Purchased plans should detail everything you need to know to build the coop.
We researched different coop ideas and then sketched out what we wanted the coop to look like. We used construction phase photos of other coops to see where our braces should be and how to secure our frame.
The exact materials you will need to make your coop will obviously depend on your specs, but I can tell you what we used to give you an idea on what this endeavor will take.
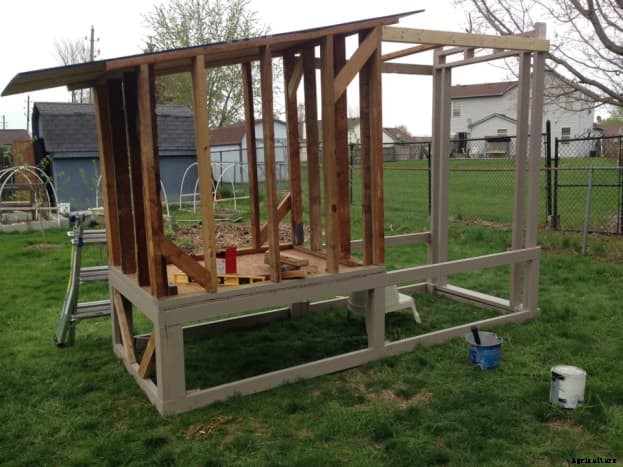


To save time, I started priming and painting the frame of the coop while my husband and father constructed the actual hen house.
1 / 5Our chicken yard consists of a 4x5 foot coop and a 4x10 foot run. We built the 4x10 foot frame first and then built the actual coop on top of 2-foot legs so that the chickens could run around underneath the coop. The whole unit is about 6' tall on the coop side and just under 8' high on the door side.
In order to save time and lumber, we tore down an old shed and used the lumber for this project to save money (my husband worked the door and windows around the basic framework of the coop). The door is narrow, but for the few times a year we have to clean out the coop, it works fine.
On the left-hand side, the roof extends over the laying boxes—which we have yet to build—to provide extra protection from the elements.
We added corner braces to provide stability and attached stakes made out of 2X4s to secure the unit to the ground.
Perhaps you got the chickens before you had a house for them to live in, or maybe the project is taking longer than you thought it would. Whatever the reason, you may find yourself needing to put your feathered friends in the coop pronto. Luckily, the coop doesn't have to be completely finished before housing your new flock. The following tips will help you get your flock in their new home right away, giving you more time to complete the coop.
Construct the basic frame of the coop and put up the walls, cutting out holes for the vents and doors only. If you are planning on working the windows around the basic framework, these can be added later, as you have time. Same goes for the laying boxes if the hens aren't yet of laying age.
If wild predators are not a likely threat, surround the run with chicken wire only on the lower 2/3rds. This will keep the chickens in and your pets out until you can get to the rest of the run.
Obviously, you will want to save any trim work for last since this can be done with the chickens inside.


