The sweet taste of glorious garden-grown peas is nothing like what you find in grocery stores; they are nature's candy off the vine! Plant peas as soon as the ground can be worked—even if snow falls afterwards. See our tips on growing peas from sowing to harvest!
Peas are very easy to grow but their growing period is limited to cool weather. Plus, peas do not stay fresh long after harvest, so enjoy their taste as soon as you can!
Did you know: St. Patrick's Day is the traditional day for planting peas? The key to growing peas is to plant them early enough in spring so they mature while the weather is still cool. This means planting in February, March, or April in most parts of the United States and Canada. However, they can also be grown as a fall or winter crop in warmer regions.
Three varieties of peas suit most garden and culinary needs:
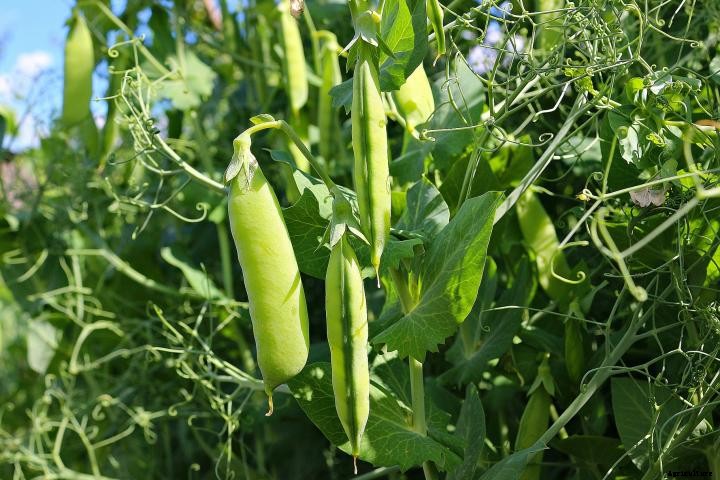
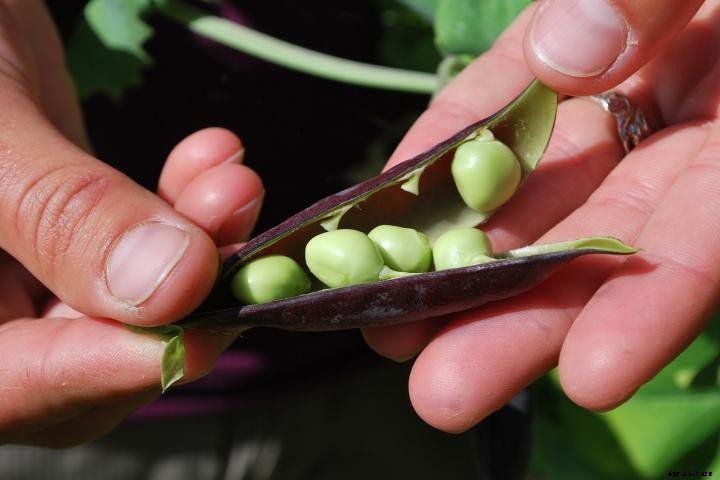
- Sweet peas, aka garden peas or English peas (Pisum sativum ssp. sativum), have inedible pods from which the seeds (peas) are taken.
- Snow peas (P. sativum var. macrocarpon) produce edible, flat, stringless pods containing small peas.
- Snap peas (P. sativum var. macrocarpon ser. cv.) produce thick, edible pods containing large/full-size peas
Great planting companions for peas include: Chives, Mint, Alyssum, Carrot, Corn, Cucumber, Radish, Turnip and Beans. Learn more about Companion Planting.
Video Demo: Growing Peas from Sowing to Harvest
Learn all about growing peas in our video demonstration and then see instructions in the guide below.
Planting
When to Plant Peas
- Sow seeds 4 to 6 weeks before the last spring frost date when the soil is cool, or when it is at the desired temperature:
- Peas planted in cold (40°F) soil will germinate slowly.
- Peas planted in soil temperature that is at least 60°F (but not more than 85°F) will catch up.
- Here are some more tips on when to start planting peas.
- Where spring is long and wet, plant in raised garden beds.
- Snow will not hurt emerging pea plants, but several days with temperatures in the teens might. Be prepared to plant again if the first peas don't make it. Alternatively, try starting your peas in a cold frame.
- A second round of peas can be planted in the late summer or early fall, approximately 6 to 8 weeks before your first fall frost date.
Preparing the Planting Site
- Select a sunny location and well-draining soil. While peas can grow in part shade, they won't be as sweet or productive as those grown in full sun.
- To give your plants the best head start, turn over your pea bed in the fall, mixing in aged manure and/or compost, and mulch well.
- Do NOT plant peas in the same place more than once in every four years. Rotate crops.
- As with other legumes, pea roots will fix nitrogen in the soil, making it available for other plants.
- In terms of fertilize, peas need phosphorus and potassium, but excess nitrogen will encourage foliage growth instead of flowers or pods. Learn more about soil amendments.
- For tall and vining pea varieties, set up poles or a trellis at the time of planting. The young tendrils need to have something to climb on immediately after emerging from the soil. Learn how to build supports here.
How to Plant Peas
- To speed germination, soak seeds in water overnight before planting.
- Sow seeds 1 inch deep (slightly deeper if soil is dry) and about 2 to 2 inches apart. Don't thin.
- Plant rows 7 inches apart.
- Although peas do not like their roots distrubed, transplanting is possible. Star seeds in biodegradable pots and transplant the pot and all into the garden; the pot wil disintegrate.
Care
- Bush peas can reach 18 to 30 inches tall. Pole types can grow to at least 4 to 6 feet tall. Both types benefit from support (especially bush peas above 2 feet and all pole peas) such as thin tree branches or twiggy sticks (pea sticks), trellises, chicken wire, strings, or netting. Plant into the ground near each plant before it germinates. See instructions on how to build trellises and supports for peas.
-
Water peas sparsely with no more than 1 inch per week, unless plants are wilting. We don't want to encourage pea rot. But also do not let the plants dry out; if this happens, no pods will be produced.
-
If seeds wash out of the soil, poke them back into it.
-
Gently remove intrusive weeds by hand; if necessary, hoe or cultivate but do so very carefully to avoid disturbing peas' shallow, fragile roots.
-
Pea leaves turn yellow for several reasons. Often, this is due to the stress of hot weather. Provide partial shade (e.g., row covers) during the hottest time of day and water properly.
-
Fertilizing plants is not usually required if the plants are mulched deeply with grass clippings, shredded leaves, or another biodegradable material.
Pests/Diseases
Pest/Disease
Type
Symptoms
Control/Prevention
Aphids
Insect
Misshapen/yellow leaves; distorted flowers/fruit; sticky "honeydew" (excrement produced by aphids); sooty, black mold that forms on honeydew; large presence of ants on plants
Grow companion plants to either attract aphids away (nasturtiums) or repel them outright (basil, rosemary, strong-scented plants); knock aphids off plants with water spray, apply insecticidal soap; put banana or orange peel around plants; wipe leaves with a 1-2% solution of liquid dish soap and water every 2-3 days for 2 weeks; add native plants to attract aphid predators. Find images and more information about aphids here.
Fusarium Wilt
Fungus
Plants wilt (sometimes on just one side) in daytime; leaves turn yellow (lower ones first); later, entire plant wilts/dies; growth is stunted; stem cross section reveals brown discoloration
Destroy infected plants; avoid excessive nitrogen in soil; in acidic soils, raise pH to 7.0; choose resistant varieties; disinfect tools between use; practice crop rotation
Downy Mildew
Fungus
Yellow, angular spots on upper leaf surfaces that turn brown; white/purple/gray cottony growth on leaf undersides only; distorted leaves; defoliation
Remove plant debris; choose resistant varieties; ensure good air circulation; avoid overhead watering
Mexican Bean Beetles
Insect
Lacey, skeletonized leaves; dark holes on pods
Remove by hand; purchase and release beneficial wasp Pediobius foveolatus when beetle larvae are observed; destroy severely infested plants. Find images and more infomation about Mexican bean beetles here.
Powdery Mildew
Fungus
Typically, white spots on upper leaf surfaces expand to flour-like coating over entire leaves; foliage may yellow/die; distortion/stunting of leaves/flowers
Destroy infected leaves or plants; choose resistant varieties; plant in full sun, if possible; ensure good air circulation; spray plants with 1 tsp baking soda dissolved in 1 qt water; remove infected plant matter from garden and destroy (don't compost). Find images and more information about powdery mildew here.
Root-knot Nematodes
Insect
Roots become "knotted" or galled; plants stunted/yellow/wilted
Destroy affected plant matter (especially roots); choose resistant varieties; expose soil to sun (solarize); add aged manure/compost; disinfect gardening tools between uses; till soil in autumn; practice crop rotation
Wireworms
Insect
Pest affects newly planted seeds and young plants. Seeds hollowed; seedlings severed; stunting/wilting; roots eaten
Sow seeds in warm soil for quick germination; provide good drainage; remove plant debris at end of season; practice crop rotation. If infestation is bad enough, trap by digging 2- to 4-inch-deep holes every 3 to 10 feet, fill with mix of germinating beans/corn/peas or potato sections as bait, cover with soil or a board, in 1 week uncover and kill collected wireworms.
White Mold
Fungus
Pods near the ground show cottony mold and black patches, and they are slimy rather than leathery or dry, becoming inedible.
Gather up affected pods and compost them. Healthy plants may produce a second crop if dry weather returns in time. To prevent, make sure plants get good air circulation and plenty of sun to dry quickly after rains. Use mulch. Avoid watering from overhead; water at soil level.
Recommended Varieties
Sweet Peas: Also known as garden or shelling peas, these are the most common type of peas available. Some good varieties to try include:
- ‘Green Arrow’: 2- to 3-foot vines; no support required; high yields; tolerant of mildew and Fusarium wilt
- 'Lincoln': 2- to 3-foot vines; no support required; tolerant of mildew and Fusarium wilt
- The classic 'Wando' (good for freezing)
- 'Thomas Laxton' (high sugar content)
- 'Progress No. 9' (good disease resistance)
- 'Little Marvel' (grows only 15 inches tall)
Snap Peas: You eat the entire tender pod of snap peas. Some good varieties to try are:
- 'Sugar Ann': vines grow only 2 feet tall, no support required.
- 'Sugar Snap': The original (Calvin's) just brought back. Carried only by Johnny's Selected Seeds.
- 'Early Snap': An early-maturing version produces peas 10 to 14 days earlier than 'Sugar Snap'
- 'Super Sugar Mel': produces 4-inch-long, very sweet pods
Snow Peas: Common in Chinese cooking, these flat-podded peas have edible pods. Some good varieties to try include:
- 'Mammoth Melting Sugar' (wilt tolerant): 4- to 5-foot vines; stringless pods
- 'Oregon Sugar Pod II': grows only 2-1/2 feet tall
- ‘Snowbird’: resistant to fusarium wilt
Harvest/Storage
How to Harvest Peas
- Most varieties of peas are ready to harvest 60 to 70 days after planting.
- Pick snow peas when the delicate pods begin to show immature seeds inside. Gather snap peas when the pods become plump yet are still glossy and filled with sweet-tasting peas. Pick shell peas before the pods become waxy.
- Peas mature quickly, so check daily once you see the flowers in bloom.
- Pick peas in the morning after the dew has dried. They are crispiest then. And pick regularly to encourage more pods to develop.
- Use two hands when you pick peas to avoid damaging plant. Hold the vine with one hand and pull pods off with the other.
- Peas are at the peak of flavor immediately after harvest.
- Pea pods that have hardened or turned a dull color are over mature. Mature plants usually stop producing and die back in hot summer weather.
- If you missed your peas' peak period, you can still pick, dry, and shell them for use in winter soups.
How to Store Peas
- Store peas in the refrigerator for about 5 days. Place in paper bags, then wrap in plastic.
- Or, freeze peas. Shell sweet peas, blanch, immerse in cold water, drain, and pack in sealed containers.
- De-string/trim snow or snap peas and prepare as above.
Wit and Wisdom
- If a girl finds nine peas in a pod, the next bachelor she meets will become her husband.
- Find out how to plant peas when there's still snow on the ground with this humorous video from the Almanac Editor.
- Legend has it that the phrase "green thumb" orginated during the reign of King Edward I of England, who was fond of green peas and kept six serfs shelling them during the season. The serf who had the greenest thumb won a prize!
Recipes
Cream of Green Pea Soup
Peas and Egg Fried Rice
Bay Scallops and Summer Peas Pasta
Gingered Beef, Snow Peas, and Carrots
Cooking Notes
Green peas can be eaten raw as a snack or in salads, although they're a bit starchy if you don't eat them right after harvesting.
Peas are also wonderful in pasta, soup, casserole, or stir-fry, sauté. Cooking times vary greatly depending on when the green peas were harvested. Young, small ones require less cooking than older, starchy ones.
To steam, put 1 inch of water in a pot, bring to a boil, place a steaming basket in the pan, slowly add peas to the steaming basket, and cover with a lid. Steam for about 2 minutes.
To microwave, put 2 tablespoons of water in a microwavable dish and cover. Microwave on high, checking every 2 minutes for doneness.
Add butter and salt as desired.


