
Welcome to Modern Agriculture!

If you’re a garlic-lover and garlic grower like me, you’ve probably got a bunch of it either in your garden or in your home right this very moment. These beautiful and delicious plants have so much versatility in the kitchen that I like to grow a big patch of them every season and store them for use throughout the year.
But storing garlic can be a challenge if you don’t know what you’re doing. There are a lot of different methods for storing garlic, some better than the others.
Let’s take a look at exactly how to preserve your garlic the right way so you can enjoy these flavorful bulbs for months to come.
Whether you’re growing garlic in your garden or purchasing it from a grocery or farmers market, there are a few quality control issues to look out for on your bulbs. Avoiding these will increase the shelf life and success rate of storing your garlic:
If you’re purchasing your garlic, you’re looking for firm, fresh bulbs with dry, papery skin on the outside. If the bulb is soft, it’s probably too ripe and won’t last long in storage. Also avoid buying garlic that is refrigerated. There are many types of garlic, but their storage is all similar, so don’t worry about that.
If you’re selecting bulbs from your garden, choose ones that look healthy and undamaged by pests or disease.
After you harvest your garlic patch, you must cure it before you can properly store it. The curing process makes sure that the remaining energy goes to your bulbs (since that’s what we care about when we grow garlic).
Before you cure your garlic:
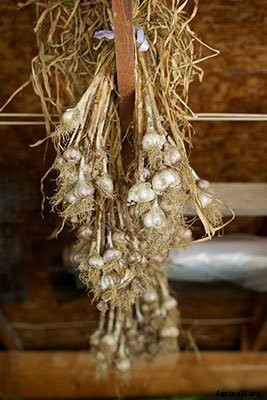
The easiest way to cure garlic is to tie it in 3-6 plant bunches and tie to a string. The strings should be located in an area with great air circulation and the ideal air temperature is around 80°F (27°C).
Leave your garlic curing for about two weeks. You’ll know it’s done curing when the skin is dry and paper, much like the garlic you’d buy at a store or farmers market.
After your garlic is cured, you have to clean it up a bit before storage.
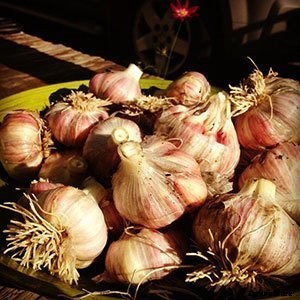
Brush your hands along the roots — they should be brittle from the curing process and come right off. Trim off the tops, but be careful not to cut too close to the bulb. You don’t want to expose any of the cloves to air.
If you’re cleaning hardneck garlic, leave the necks on so you can crack them open easier in the future.
Only remove extremely dirty outer layers of the papery skin. Otherwise, keep it on as it helps your garlic stay fresh.
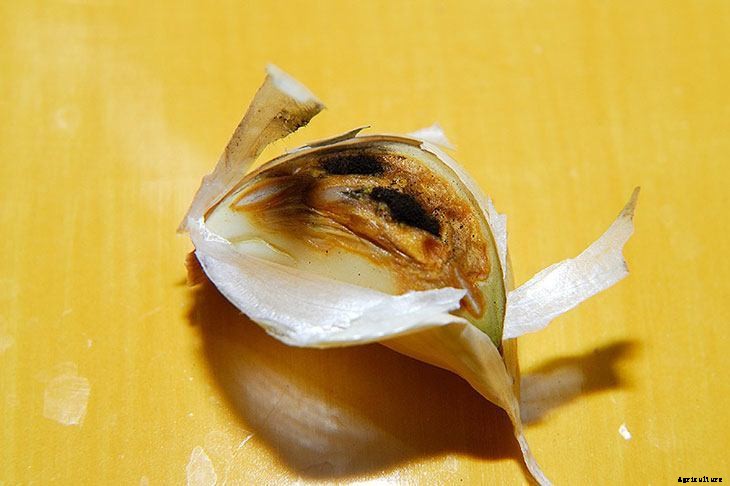
Cleaning Tip: If you see any damaged cloves that you missed earlier, remove them from the bulbs. If some of your bulbs are soft after curing, use them in the kitchen instead — they won’t store well.
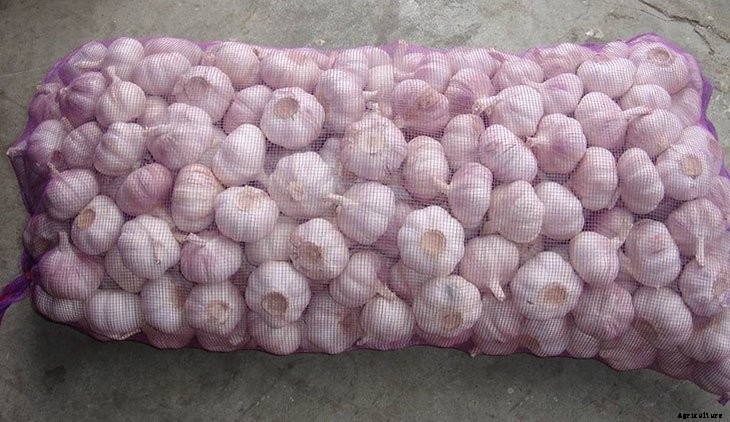
The simplest way to preserve your garlic haul is to place it in mesh produce bags that you can buy online. These are reusable and provide the air circulation your garlic will need to keep well.
Here are the environmental requirements for storing garlic:
If the temperature drops too much, your bulbs will begin to sprout after the temperature rises again. This is why attempting to preserve store-bought garlic that was kept in the refrigerated section is a bad idea.
If the humidity is too low, your garlic will dry out too quickly and shrivel.
If the air circulation is poor, your garlic has a high chance of rotting.
When cured, cleaned, and stored properly, garlic will keep for over half a year (sometimes over a year).
If you have fresh bulbs of garlic that you want to preserve faster than the method I outline above, there are a lot of different options for you. Some are better than others, and some popular methods of storing garlic can actually be quite dangerous — so read on.
Storing fresh garlic in the fridge is generally not a good idea. This is because garlic bulbs are low-acidity, making them prone to Clostridium botulinum, better known as the culprit behind botulism.
When you see garlic sold at the store in oil, it typically has a preservative like citric acid added to increase the acidity of the mixture, preventing Clostridium botulinum from forming. It is also stored at a lower temperature in commercial fridges than your fridge at home is capable of reaching in most cases.
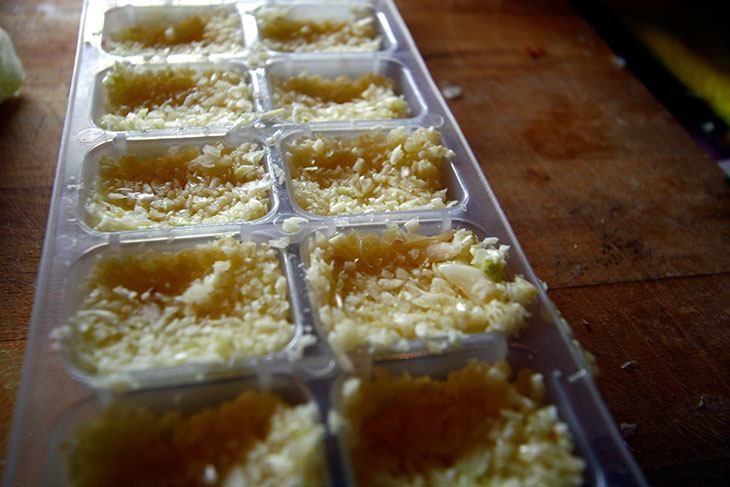
Freezing fresh garlic is a fantastic option. Here are the best ways to do it:
No matter which method you choose, it’s vital that you freeze it as soon as you’re finishing preparing. Don’t put it in the fridge or leave it out, for reasons listed in the fridge section above.
It’s best not to can garlic. As mentioned in the refrigerating garlic section, it’s a low-acidity plant that is prone to Clostridium botulinum. The spores also proliferate in low-oxygen environments, which canned foods are known for.
To dry garlic cloves, first be sure that they’re fresh and not soft or bruised. Peel your cloves and cut each of them in half. Dry them at around 140˚F (60˚C) for two hours. After two hours, reduce to 130˚F (54˚C). Take them out of the oven or food dehydrator when they are fully dry.
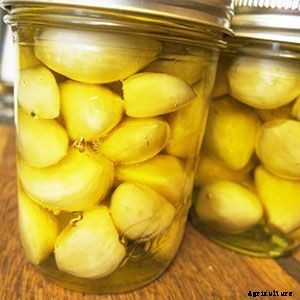
If you decide to store your garlic in oil, you need to be extra vigilant due to the potential for Clostridium botulinum development. Whatever you do, do not store at room temperature. In fact, it’s actually illegal for commercial garlic product providers to store their garlic in oil that hasn’t been acidified with something like citric acid.
Because it’s not convenient to acidify your garlic + oil mixture at home, freezing immediately after preparation is best.
One of the more interesting ways to store garlic is to place cloves into vinegar or wine and put them in the fridge. If you’re using wine, go with a dry white wine. If using vinegar, white vinegar will work. It will keep for 3-5 months in the fridge.
If you use this method, keep a watchful eye for any unusual growth on the surface of your container. This is usually mold or yeast forming due to a higher than ideal temperature, so make sure your fridge is cold enough.
No matter what storage method you use, there are a ton of wonderful ways to use garlic! Here are a few of my favorites, but please comment below with yours — I’m always looking for more ways to use this delicious vegetable.
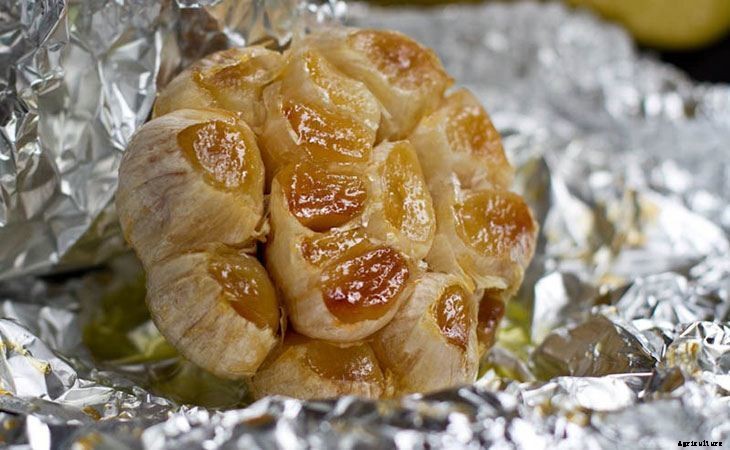
Roasting garlic is my favorite way to cook it, due to sweet flavor that contrasts the typical flavor profile of most garlic. I love spreading it on bread or using it as a way to marinade meats.
To roast it, simply chop off the tip of the bulb to reveal an inkling of the tops of the cloves. Then wrap them in foil and drizzle some olive oil over them. Place them in the oven at 350°F (176°C) for about a half an hour to an hour. once the bulbs are soft, you can squeeze the roasted garlic straight out of the bulb.
Pickling garlic is a favorite of many gardeners and chefs alike. It brings the pungent, strong flavor of garlic down a bit, meaning you can throw many cloves into a dish and the flavor won’t overpower everything else.
I won’t get into a full garlic pickling tutorial here, but you can peel garlic cloves and throw them in the fridge with salt and vinegar.
While storing fresh garlic in oil is a bad idea (unless you freeze it immediately), you can make garlic oil using dried garlic. Put chopped dried garlic into a small container and pour in some oil. Let sit for a while for the flavors to infuse and then use to your heart’s content.
After you’ve dried garlic, you can make an easy garlic salt by tossing it in a food processor and chopping it until it is fine-grained. Add salt of your choosing to your garlic in a 4:1 ratio and pulse for a few seconds. Don’t blend too long — you’ll create too fine a mixture and it will clump up.
Do you have a favorite method for storing or using garlic? Let me know in the comments below!


