
Welcome to Modern Agriculture!

I would love to share with on the process of planting orchids. Also, I would love to share with you how to take good care of your orchid. The processes are involved in selecting the orchid, anatomy, acclimating, watering, and fertilizing.
When selecting an orchid, you usually want to buy it because you want to see them flower either NOW or sometime shortly. Most of the time, when selecting an orchid, the orchids that you will purchase in a store are mericloned orchids, which means they are identical to each other.
That being said, some do not look identical, and that is due to the way the orchid was grown. So here are great tips on how to select a healthy orchid, mericlone or not.
A Mericlone orchid is made by taking meristematic tissue of the parent orchid and growing new copies. This should and most of the time will result in a faithful copy of the original plant. The deciding factor in whether the Mericlone looks the same as another is the way they are grown.

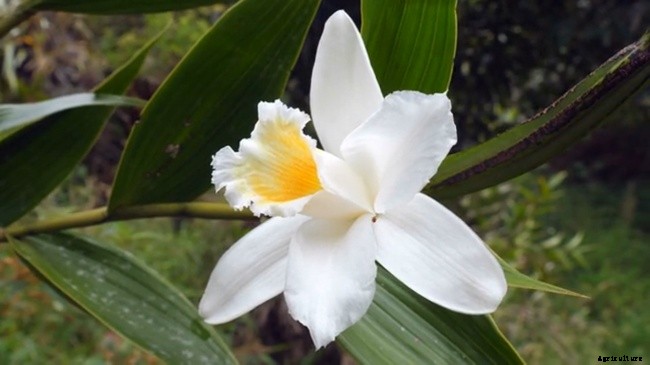
The anatomy of an orchid is fairly simple. You will usually have three sepals, three petals, a column, a spike, leaves, and a root system. There are variations from flower to flower, and there are subparts to these main parts of the orchid. I’ll discuss what they are and how they look.
Sepals – Sepals are part of the flower bud. In orchids, they can be very colorful and large. They look like petals but are actually the protecting cover of the flower when the orchid is not in bloom.
Petals – Orchids consist of three petals. Two lateral petals and a flower petal called the lip. The lip is usually a brighter color and is used to aid in pollination.
Column – The column is in the center of the orchid and is where the reproductive organs are stored. The column usually has another cap as well. Both male and female reproductive organs are carried in the column (gynostemium).
Spike – The spike is simple the stem or inflorescence. This is the part of the orchid that carries the flowering portion of the orchid.
Bud – A bud is the flowering portion of the orchid that is unopened and consisting of three closed sepals.
Node – Nodes are defined notches on the spike.
Pseudobulb – A swollen bulb at the base of the leaves of some orchids used for water storage.
A crucial step when learning how to care for orchids is acclimating your orchid. When you bring your orchid home, it will most likely be in shock. Orchids do not like being moved, most especially when they are flowering.
The first days of acclimating your orchid are key to its long-term life. Do not expose your orchid to direct sunlight just yet, cold or downward drafts from your vents. Also, do not get water happy, as it is better to let the orchid dry up a little bit rather than drowning it while you are acclimating and growing your orchid.
A common occurrence when acclimating an orchid is Black Rot, which is from overexposing your orchid to water. Orchids thrive in high humidity areas with steady moisture, but their tolerance for water is limited.
Tips for Acclimating your orchid:
Once you’re done acclimating your orchid, and it’s kept healthy (which might take moving the orchid to find the right spot for it), it will fall into a routine. They show this by throwing out roots, leaves, and canes, which will result in your orchid rewarding you with a bloom yearly.
Acclimating your orchid is a necessary step whenever you get a new orchid. If you follow the steps above and give your orchid enough attention, you should be fine!
Watering orchids is probably one of the most important things you need to do correctly to produce quality flowers. People often do wrong when watering orchids is overwater their orchids, which rots the roots and ruins the feeding system of the plant.
Orchids are relatively easy to take care of when it comes to watering. Depending on the environment you have the orchids in, watering orchids could occur anywhere from once a week to once every other week.
When to Water
So, how do you tell when to water your orchid? There are many different ways that people have talked about on the internet and in books. You could use the toothpick test and dip the toothpick into your bark or moss medium, and if the toothpick comes out dark, then wait a day or two before watering.
You could feel the weight of the plant and the pot. It will be much lighter when it is scorched and ready for watering. This takes some time and experience, though, to do it by weight.
The standard “go-to” is to dip your finger in the pot and see if it comes out moist. You can check the roots and the leaves as well. If the roots are fairly soft and a little wrinkled, and the leaves are drooping a little bit, then it’s time to water. Just remember, overwatering is probably the most common cause of root rot and orchid demise.
Lastly, ALWAYS water in the morning. This is because you want the orchids to get a full day of light after watering. After all, if done at night, the water will not evaporate fast enough, leading to root rot.
How to Water
When watering orchids, you will want to drench the orchid completely to the brim of the pot. The best way to do this if indoors is in the sink. If you are using a double pot (plastic on the inside with holes for draining, and maybe a decorative outer pot), then you can leave it in the double pot to soak for 10 to 30 minutes in most cases.
After letting it soak, you will take the inner pot out and place it in the sink to drain completely. It’s very important to let the plant’s medium completely drain to avoid root rot.
Water quality
The quality of the water is obviously important while watering orchids. It is essential to understand what type of water you are getting and who you are getting it from to find out information on the quality.
Most places are pretty good, but if you’re in doubt, you can treat your water with a reverse-osmosis system to filter out harmful salts. To forewarn you, they can be expensive, but if you are really serious and have bad water, this might be for you.
If you doubt and don’t have many plants, I recommend buying a couple of jugs of distilled water. In the future, I’ll post an article about DI water vs. Distilled vs. RO, but for now, let’s stick to the basics.
Now when watering, you will also want to feed your plant with a little bit of fertilizer.
It’s also important to understand that there are exceptions to every rule, and not every orchid is the same. These are just general tips for beginners that want to get started with a basic orchid.
Read also: Healthy Orchids Stems and Roots For Flourishing Blooms
Fertilizing is a very important part of making sure that your plant can really grow to its potential. The common saying is, “weakly, weekly,” basically just saying to go with a weaker dose for fertilizer more often. When fertilizing orchids, you want to view it compared to feeding a person: Too much food equals health problems, and the same holds for orchids.
Below you will read how fertilizing orchids is done correctly: how often to fertilize, what to look for in a fertilizer, and what to avoid when fertilizing or feeding your orchids.
What to Look for in a Fertilizer
The number one thing that you want to look for when fertilizing orchids is an orchid-specific fertilizer. The three main necessary ingredients are Nitrogen (N) for healthy vegetative growth, Phosphorus (P) for flower production, and Potassium (K) for overall plant health, control of flower, and vigor.
The way they will be presented on the label will be in a three-part percentage such as 20/20/20. This means that there is twenty percent of each element, with 40% trace or inert elements. You never want to go over 20% N content because the orchid won’t use it, and it will merely turn into a pollutant.
Some research shows that P is not as important as once thought, so low P content may not be bad either. In any case, you want to find a fertilizer that has LITTLE OR NO UREA. Urea is a form of nitrogen and doesn’t convert well in the porous potting medium used for orchids.
How to Correctly Feed Your Orchid
The best way for beginners is to start more dilute and see how that works before concentrating the fertilizer. People use many different methods when fertilizing orchids, but to start, you want to probably go with 1/4 the recommended dosage if you are fertilizing weekly.
If you’re on a weekly watering schedule, it’s always a good thing to go without fertilizer once a month. If you’re on a bi-weekly fertilization schedule, you probably want to go plain water for rinsing every third watering cycle. This will give the orchid a nice wash of any built-up salts from the fertilizer.
ALWAYS drench the potting medium before putting the fertilizer/water mix in. This is because of how porous the medium for orchids is, making it harder for the medium to retain water. If you don’t drench with plain water before fertilization, you could see root burn damage from the fertilizer.
You should only participate in fertilizing orchids in the Spring/Summer months when they show signs of fresh growth. Most orchids are dormant in the winter months, and there is no use feeding a dormant plant.
Unless you are a highly experienced orchid grower, a steady dose of fertilizer during the right time of year will go a long way with all of your orchids. Some seasoned orchid growers will find specialized bloom-boosters that offer micronutrients that increase orchid flowering.
Most house orchids carry different types of genera that flower at different times of the year and have different requirements. A high-quality fertilizer that is well balanced will benefit ALL of your plants.
Read also: 5 Factors Required For Orchid Repotting – When and How?


