
Welcome to Modern Agriculture!

Introduction to growing sweet potatoes in the backyard
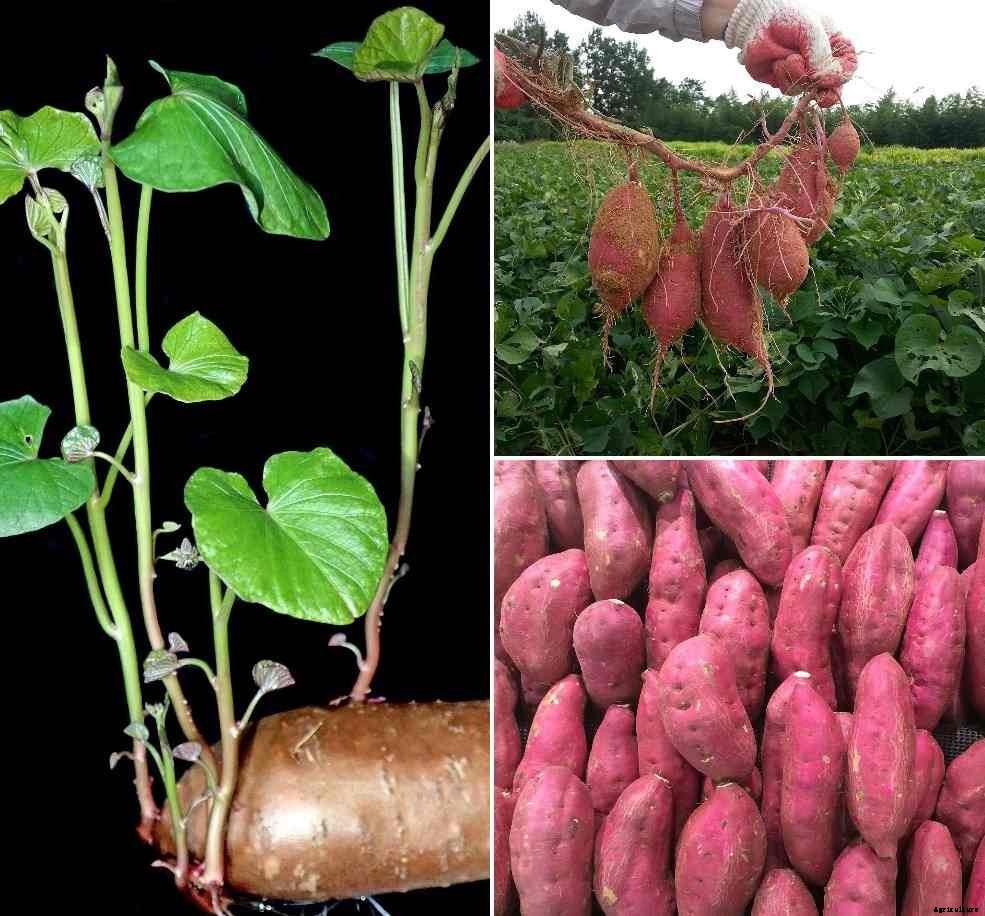
The botanical name of sweet potato is Ipomoea batatas. Growing sweet potatoes in the backyard are easy and fun, and this is a great way to enjoy super-sweet tubers that tastes so much better than those you’ll find at the local supermarket. If you’re wondering how to grow sweet potatoes in your home vegetable garden, here we have all the information and advice you need to get started.
Sweet potatoes are grown from slips, which are rooted sprouts from mature tubers. These tender, rooted sprouts can be purchased by mail or sometimes as potted plants at a garden center. Sweet potatoes are starchy tubers that form underground like regular potatoes. But the heart-leafed vine that produces sweet potatoes requires a longer growing season (100 to 140 days) and warmer soil than the kind of plant that produces regular white potatoes. Until recently, that’s made them almost impossible to grow in the colder parts of the country. Now, with short-season sweet potato varieties, such as Georgia Jet, and soil-warming growing techniques, gardeners everywhere can enjoy growing this easy and delicious crop.
In this article, we will let you know the varieties of sweet potatoes, and steps involved in growing sweet potatoes, and some pests and diseases of sweet potatoes, and some tips in growing sweet potatoes, and etc. So, let’s dive into the topic.
There are some varieties of sweet potatoes listed below:
Beauregard: This popular commercial variety produces a potato with pale reddish skin and dark orange flesh that takes 100 days until it reaches maturity.
Bush Porto Rico: The compact vines yield a potato with copper skin and orange flesh after 110 days. This variety has big yields, so are good for smaller gardens.
Centennial: This type has good disease resistance and is relatively quick to mature, averaging about 90 days to reach maturity.
Georgia Jet: Known for its reddish skin and orange flesh, the Georgia Jet is a good choice for a shorter season because it only takes 90 days to reach maturity.
You should not miss this: Easy Vegetables to Grow in the Pots.
Here are the steps to grow sweet potatoes in the backyard. And it all starts with the sweet potato slip.
Sweet potatoes grow from something called slips. Those are the green vines that grow out of sweet potato when it sprouts. They’re taken off and planted in the ground to create a new sweet potato plant.
A single sprouting sweet potato can provide you with at least 15 slips. Those 15 slips create 15 plants, which will give you around 30 lbs or 60 individual sweet potatoes. It may take a few weeks or even a month before you see green growth sprouting from the top of the tuber.
Once you’ve got your sweet potatoes, these are the ways to produce slips:
Once the sweet potato tuber has sprouted, your next step is to separate the sprouts into individual slips that can be planted.
The best soil for sweet potatoes is loose and rich in organic matter. In the garden, mix some well-aged compost into each planting hole and then plant slips 12-18″ apart, burying the stem with soil right up to the first pair of leaves. If your soil is clay, rocky, or compacted, consider raised beds.
To produce a worthwhile harvest, sweet potatoes need 3 to 4 months of warm temperatures, so the key is to plant them early enough for them to mature properly, but not early enough for them to get killed by a late spring frost. Slips should be planted in warm soil 3 to 4 weeks after the last spring frost, once nighttime temperatures have reached at least 13°C.
Sweet potato plants are sensitive to cold, so they should not be planted outdoors until the soil has warmed to at least 15°C and nighttime temperatures are above 15°C.
For taking care of sweet potatoes you need to consider the following:
Light requirement for growing sweet potatoes in the backayard
Be sure to plant your sweet potatoes in full sun to part shade. Sweet potatoes generally prefer full sunlight but appreciate some afternoon shade in hot, dry regions.
Soil requirement for growing sweet potatoes in the home backyard
Sweet potatoes prefer soil that is well-drained but high in organic matter. Sandier soil is preferable to dense, clay soil. Slightly acidic soil with a pH between 6.0 and 6.5 is ideal. Sandy loam that’s well-draining but nutrient-dense will make this sun-loving tropical vine happiest.
Water requirement for growing sweet potatoes in the backyard garden
Sweet potatoes will tolerate growing in dry soil once established. It’s best to keep it evenly moist with an inch of water once a week. Don’t water your sweet potatoes during the final three to four weeks prior to harvest in order to keep the mature tubers from splitting.
Temperature and humidity
Sweet potatoes should not be planted outdoors until the temperature of the soil has warmed to 15°C. Soil growing temperatures of sweet potatoes should be between 15 to 30°C and an air growing temperature should be between 18 to 35°C.
Fertilizer for growing sweet potatoes in the backyard garden
Feeding sweet potatoes tend to produce just foliage. You can add compost to the beds before planting the sweet potatoes.
Sweet potatoes will be one of the last things you plant in your garden. They must go in later than peppers, tomatoes, and other heat-loving plants because sweet potatoes need warm soil as well as warm air.
You can speed up your soil warming by laying a layer of black thermal plastic in your garden bed. It will heat the soil up by as much as 10 degrees which means you can plant sweet potato slips 1-2 weeks sooner than if you don’t use plastic.
Continue the same process until all of your slips are planted. Planting the slips closer than 1′ together will reduce your yield and produce much smaller sweet potatoes. Don’t fertilize your sweet potatoes at planting time as they don’t require much in the way of nutrients. An excess of nitrogen will encourage leafy growth rather than big tubers.
Once your sweet potato slips have been planted in the garden, water them well and continue to irrigate the bed daily for the first week if there has been no rain. After they’ve adapted to their new home, you can reduce watering, but keep in mind that drought-stressed plants yield fewer and smaller sweet potatoes. If you’re not growing them under the black plastic mulch, mulch plants with straw or shredded leaves to reduce the need to water.
Expect the newly planted sweet potato slips to sit for a few weeks as they put on root growth. Once the heat arrives, the vines quickly take off. If the spring weather experiences a setback and cold temperatures are in the forecast, cover your plants with a row cover to insulate them.
For good harvests, do not prune the vines, because they should be vigorous.
The tubers are ready to harvest in about four months. If you like to eat the leaves as greens, you can do so in moderation throughout the season. Be sure to leave enough to keep the plant growing. You can dig your tubers once the foliage starts to yellow. If the foliage is hit by a frost, the tubers are probably still fine. Just don’t let them sit in the ground too long after the tops die back or they could start to rot.
If the vines get touched by frost and start to turn black the sweet potatoes can rot quickly so dig them up right away!
Harvesting sweet potatoes don’t end with digging them up. Once you dig them up you have to let them dry in the sun for a few hours. Then they need to be brought inside and cured for 10 days and then cured some more for another month or so.
Curing the sweet potatoes
Once you’ve harvested all your sweet potatoes, it’s time to cure them. Curing allows the flesh to sweeten up and heals small wounds or cracks on the skin for long-term storage. Proper curing requires warm to hot temperatures and high humidity. If you only have a small number of tubers and don’t plan on keeping them for more than a few months, quickly cure them at 20 to 25°C over one to two weeks.
Storing the sweet potatoes
Store the sweet potatoes in a root cellar, basement, or other places with a temperature of at least 13°C. If stored at a temperature range of 13–15.5°C with high humidity, the tubers should last for about 6 months.
Store sweet potatoes in an area that doesn’t get below 50 degrees in a container that breathes like a slatted wooden box or a burlap sack.
Some pests and diseases of sweet potatoes are:
Diseases
Small gray-black oval scratch with lighter centers may occur on stems and leaf petioles and occasionally on leaves.
Control: Destroy all sweet potato crop residue immediately the following harvest; plant resistant or tolerant sweet potato varieties where available; plant only disease-free seed material.
Causes plant death; stunted plants; wilting plants; yellowing plants; dropping leaves; circular brown-black patches of rot on tubers.
Control: Only disease-free seed material should be planted; transplant material should be collected from plants by making cuts above-ground; seed material should be treated with an appropriate fungicide prior to planting.
Growth of white mold, deep, dark rot extending deep into tuber and forming elliptical cavities; the swollen and distorted base of stems.
Control: Select only disease-free roots for seed; use cut transplants rather than slips; practice crop rotation; treat seed roots with an appropriate fungicide prior to planting.
Pests
Larvae bore into the stem leading to the storage roots. Feeding in the crown region leads to wilting, yellowing, and dying of plants.
Control: Fallow the land for a few seasons if the infestation is more. Use insect-free planting material. Use pheromone traps to monitor and control the insect.
Including main stem and roots, grub feeds on underground parts. They also feed on tubers by making tunnels. The infected plant becomes wilted and dies eventually.
Control: Provide proper drainage to the soil to avoid excess moisture. Application of biocontrol agents like Bacillus popilliae and B. lentimorbus bacteria kill the grubs.
Some other pests and diseases are:
Here are some tips to grow sweet potatoes in the backyard:
In case if you are interested in Profitable Food Business Ideas.

