Agricultural Soil Testing / Garden Soil Testing
Today, let us talk about Agricultural Soil Testing, or Garden Soil Testing.
What is Soil Testing? Well, soil testing is used to determine the level of fertility of the soil in your garden or field. It is also done to check the health of the soil in order to grow the plants. This is done by checking the pH level of the soil. All the deficiencies in nutrients in the soil can be known by testing it. The pH level of the soil should be at 6.5 for most types of plants, fruits, flowers to grow in a healthy way Few plants like blueberries require soil with more acidic level to survive. So, if you check the pH level of the soil prior to planting, you can make the adjustment required to grow the plants you have planned for. If the pH level of the soil increases, the main nutrients in the soil like nitrogen, phosphorus and iron will disappear. When the pH level of the soil decreases, there would be a rise in the toxic levels of the soil causing harmful effects to the plants.
Importance of Soil Testing:
- Due to too much application of nutrients, it is leading to an imbalance in the soil, which is in turn affecting the environmental conditions.
- If the soil has so much nitrogen in it, leaching takes place and the underground water will be contaminated. The fertilizers we use at the present will not have the content of phosphorus. This is because, since years, this has been overapplied and as it gets bind easily with the soil, the use of phosphorus is not encouraged.
- If you get the soil in your garden tested, then you would get a chance to fix any kind of issues related to nutrients and can act accordingly.
- By conducting a soil test, you would also get a chance to create a healthy environment with a perfect oil condition. This will lead to maximum growth of plants.
- The reports which are taken after testing the soil will make you learn about what fertilizers to apply.
- You will also get to know the number of micronutrients needed for your plant growth.
- You can completely get a tool in managing the farm and to get good yields.
- You can grow plants which are tolerant to diseases by testing the soil prior to planting.
Read: Soil Types and Suitable Crops.
Testing Soil in the Garden or Field
- In order to start testing the soil in your garden, you need to create a wedge in the ground which is V-shaped by using a trowel. This wedge should be of width 2 to 2.5 inches and at a depth of 6 to 7 inches. Then you need to take off the wedge and remove or cut the chunk which is off 2.5 inches from the middle of the sample. This sample should be placed in a bowl or bucket which is non-metal.
- The quantity of soil you need to take for testing depends on the area size you are conducting the sampling. If your area is too large, then you need to repeat the first step by choosing approximately 10 places within the garden.
- All the soil samples which are collected from different spots of the garden should be mixed and dried out completely.
- Now the required amount of soil should be placed in a plastic bag.
- Then you need to fill the information sheet which involves all the details about the soil and then attach the sample soil placed in the plastic bag and send it.
- If you are sending more than one sample, make sure that you are mentioning the places where the respective samples are collected.
- If you’re sending multiple samples, be sure to record where each sample was collected.
- Make sure that you are also sending a sample which involves deep soil. This is because the deep soil, which would be found after digging 5 inches from the ground will be needed to check the organisms, nutrient content, organic matter and the roots of the plant.
- There is no need to send the sample and get the reports every year. It would be better if you get it done for every three years. Make sure that you are sending the samples to the same lab every year to get consistent results.
- Winter will be the best season to send the samples. You can also send the samples in the early stages of summer.
- The important factor you need to remember is that the recommendations will be different for each crop. So while sending the sample to the local extension office, make sure you are mentioning the type of crops you want to grow in your garden.
Note: Do not think that there would be an overall view of the soil. They would only test the levels of calcium, potassium, phosphorus, magnesium present in the soil. The soil is also tested for pH and organic matter. Every plant required nitrogen, phosphorus, and potassium to grow. These will be found in commercial fertilizers. Nitrogen cannot be tested perfectly as it moves inside and outside the soil and any conclusions made will change quickly. Before sending the samples, make a call to the local extension office and talk to some executive regarding what type of tests would be done to the soil. This would help you to request them for any specific tests you want to make.
Basic Soil Tests you can do at Home:
To test the structure of the soil
 Testing Soil Profile.
When the soil is neutral, i.e., it is neither wet nor dry, then you need to dig a hole which is of depth 5 to 10 inches. Now isolate the section of soil, which is intact and break it by using your fingers. This test will allow you to know if your soil is in a powdered form or granular. The soil should be in such a way that it can withhold pressure and maintain its shape. If the crumbs are breaking only with a lot of hard work, it means that the soil is very hard. The soils which are porous are preferred as they will allow water and oxygen to flow through them and this makes the roots to develop in a healthy way. Compaction of soil:
Take a flag which is wired and try inducing it in the soil at different places of the garden. Make sure you are marking how much depth did the flag go. If the flag bends quickly, then it means that the soil is compact. If the soil is penetrated to a foot level or more, then it is considered to be a good one.
Workability of soil
The workability of soil is considered to be low when the soil when dug, produces thick clumps. The soil, which is workable makes the water to reach up to the roots and it is nor crushed or compressed easily. If this test is a failure, then almost all the test of the soil will be a failure.
Organisms present in the soil
Know the life of animals in your soil first. This can be done by digging the soil and checking the hole continuously for 5 minutes. Note the number of types of organisms which you observed such as spiders, beetles, etc. If the number is less than ten, then it means that the soil did not have sufficient players involved in the food chain.
If you have a good number of bacteria, fungi or insects, then it means that the quality of the soil is good and there is less use of fertilizers to the plants. If there are living organisms in the soil, then they live on the plant residue which in turn helps in the addition of nutrients required for the growth
Read: Borewell Drilling Cost, Pump Price, and Pipe Cost.
Earthworms
When your soil is neutral, then monitor the surface of the soil if they have any burrows of earthworms. Dig the soil up to 5 inches and check for the number of earthworms moving in a tensed way on your shovel. You can have up to three to five worms in the soil. If there are no worms in the soil at all, then it means that the soil does not have any organic matter so that the worms can feed themselves. The waste produced by worms will fill the soil with nutrients required for plants, organic matter, bacteria. They also help in increasing the infiltration of water and the components they secrete will bind the particles of soil to provide better cultivation of plants.
The residue of plants
If you have grown crops to enrich the soil such as cover crops, then dig the soil for 6 inches after turning down the plant and check for the plant matter. The main thing to observe here is the organic matter present. If you can recognize the parts of the plant which is cut along with the fibers, then it means that the soil has good decomposition rate.
Conducting this step is important along with the decomposition speed. In the soil, which has poor oxygen, the plants will decompose very slowly giving a sour odor. If the decomposition is done quickly, it means that the soil has good quality.
Plant vigor
This test should be done in a season, which has a very good growth of plants. You need to select a plant which is uniform and healthy from your garden. Then you need to check if the development is matching to the conditions of your region. The plant vigor is an indication of the perfect structure of soil and its cultivation. It also shows the water supply whether it is regulated in a good way or not and also about the organism population.
Infiltration of water
This is one of the best ways to know if you are managing the soil in a good way without digging the soil. To check this, use a coffee can which is empty. Remove the bottom of the can and push it into the soil. 4 inches will remain on the surface of the soil. Now fill the water in the can. You need to make a note of the height of water and the time soil is taking to absorb it, If the absorption rate is less than 1 inch per hour, then it means that the soil is compressed or crushed. Infiltration is important because it makes the water reach the appropriate parts of the plants preventing soil erosion. This also makes the air flow easily between the pores of the soil.
Availability of water
For this test to conduct, you need to wait for heavy rain which soaks the soil. Now start observing how much time the plants are taking to consume the water and again show thirst. If the plants need water very quickly, which is not suitable for your region, then you need to deal with the soil. The soil, which is porous will resist the evaporation of water and supply that water to the plants whenever necessary.
Alkalinity Test
- To test the salt levels of the soil, you need to dig the soil for a depth of 5 inches and collect the soil. If your garden is small, you can collect samples from different spots and mix it, whereas if your garden if large, then you need to conduct the tests separately.
- Clean the soil and make sure you are removing any stones or sticks from it. Also, remove if you find any organisms.
- Take a cup of soil and place it in a container and add water until the soil becomes mud.
- Then add a half cup of vinegar and stir it.
- After doing the above process, if your soil makes bubbles, then it means that your soil is alkaline in nature. Remove any stones, sticks, or other foreign debris
Acidity test
- To test the acid levels of the soil, you need to dig the soil for a depth of 5 inches and collect the soil. Make sure you are not trying this on the soil on which you conducted the alkaline test.
- Clean the soil and make sure you are removing any stones or sticks from it. Also, remove if you find any organisms.
- Take a cup of soil and place it in a container and add water until the soil becomes mud.
- Now add a half cup of baking soda and stir it.
- After doing the above process, if your soil makes bubbles, then it means that your soil is acidic in nature.
Read: Hydrogel Agriculture Technology.
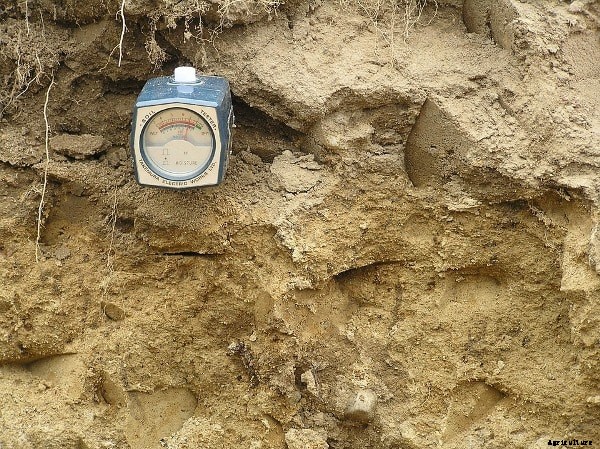
Soil pH Meter:
- Soil pH meters are the devices which are used to test the levels of alkalinity and acidity in the soil.
- This device consists of an indicator and a probe. You will make the probe to come in contact with the soil in order to start the process. The indicator helps in giving the exact reading of the pH levels.
- Plants present in different regions prefer different levels of pH, which ranges from 4 to 8. This pH level is affected by the rainfall in the region, minerals present in the soil and the other plants.
- A few soil pH meters have digital indicators while few have analogue indicators. Analog meters will give the appropriate pH level by using the needle as indicators and the digital ones will have screens which are used to display the level of pH in the soil.
- The digital devices run on batteries and the analogue meters have batteries internally which cannot be replaced. The difference between digital and analogue systems is the display.
Using a soil pH Meter:
- To start using the soil pH meter, you need to collect the soil from one spot in your garden area by digging it to a depth of up to 3 inches.
- You need to make the soil free of any stones, large pieces or leaves.
- Now pour some water collected from rains or even bottled water can be preferred. Mix the soil until the soil gets the consistency of semi-solid.
- Now clean the probe of the soil pH meter with a clean towel and put into the hole which is dug. It should be at a depth of at least 6 cms.
- Wait for a minute so that the testing would be done effectively.
- When the needle or the screen has come to a point, then check the value it is showing. The neutral pH is 6,5. Anything less than that is acidic and more than that is alkaline.
- Now you can choose the correct plan, keeping in mind the conditions of the soil.
Maintenance of Soil pH Meter:
- As soil pH meter is a simple device, there is very basic maintenance too.
- It can be kept with other tools of gardening for storage.
- These should be cleaned before every use with a towel.
- The pH testers which are digital require good care as they need changes in batteries.
Soil pH Test Kit:
- This is a kit used to test the soil. You need to take some soil into one of the tubs along with the test mix and add some water. This has to be shaken thoroughly. The changes in the color of the solution act as an indication of pH levels in the soil. These kits are used for conducting small tests which give you the basic soil conditions required. The pH meter is beneficial as it can be used multiple times and that too very quickly.
- This kit shows the content of Nitrogen, potassium, and phosphorus in the soil. These three are the most important nutrients required for the soil for the effective growth of plants. If the alkaline and acid levels are maintained at 6.5, then it seems to be an ideal soil for cultivation. These are available in retail shops.
- To start using the test kit, you need to select seven spots in your garden, dig up to five inches deep and collect the soil. Make sure that the soil is not including any roots or stones.
- For the soil sample, mix some soil from each sample and place it together. Then place the mixed one in a quart jar. Do not touch the samples with your hands directly. This is because touching it with hands will affect the pH levels of the soil because of the oils present on your hands.
- Transfer the sample collected into the vial which is provided with the soil test kit with the help of a spoon. Just fill the soil until the indication line. Then take the capsule given in the soil test kit and open it carefully. Then pour the powder present in the capsule into the vial which is containing your soil sample.
- After adding the capsule, add water to the vial by using the eyedropper which is provided in the kit. The water you use should be distilled and it should be filled till the dotted line.
- Now place a lid on the vial and shake it thoroughly. This makes the soil, powder and water mix well.
- To check the results of the test, make the mixture which is shaken to sit for 2 to 3 minutes so that there would be enough time for the liquids to get settled and change the color accordingly.
- The pH level of the soil if declared by seeing the color of the liquid. To get the perfect judgment regarding the color, hold the vial and put it in the direction of the sun by holding it high.
Read: Garden Compost Making Process.
Cost of Agricultural Soil Testing:
The cost of testing the soil completely depends on the extent of testing. If you want to hire a professional in agriculture, then the costs would be different. The pH analysis will cost around 15$ to 20$. If you want to check for soil components, then it would go up to 40 to 50 $. If you want to have the test results to be quick or if you are sending the samples to remote locations, then the price would be high.
Cost of Soil Testing Kits:
The cost of soil testing kit ranges from starts from 5$ and reaches up to 250$ depending on the technical values of the kit.
In India, you may get Soil testing kits from Rs.4,000 to 9,000 and Soil pH Meters cost about Rs. 600 to 1500.
Read: Turmeric Cultivation.


