
Welcome to Modern Agriculture!

Building a basic chicken coop for a small flock of birds is a solid weekend project for the determined do-it-yourselfer with basic carpentry skills, while the more elaborate coops could easily take several weeks (and will require advanced carpentry skills).
The internet is awash in plans for backyard chicken coops, which are a great place to look for inspiration, but all coops have two main components: an enclosed space for sleeping and laying eggs and an open air ‘chicken run’ to roam around in during the day. The enclosed space should open directly to the run, but should be elevated at least two feet above it so there is space to collect the droppings that fall through the floor. (More on that in a moment.) There are many possible ways to configure a coop, but here’s how to build a basic model that can easily be customized according to your aesthetic tastes.
The first thing to consider is size. The accepted minimum sizes are 2 to 3 square feet per bird inside the coop and 4 to 5 square feet per bird in the run. However, extra space is always better – just like humans, chickens are prone to squabbling when they’re packed in tight quarters at all times.
Chickens need shade in the heat of the day, so locating the coop under a large deciduous tree is ideal – they will be cool in summer and can bask in the sun during winter once the leaves have dropped. If a site under a large tree is not available, you’ll have to shade the run with shade cloth.
As with most outbuildings, the simplest approach is to begin with a rectangular frame and then add on the various components that are needed. Use naturally rot-resistant lumber – such as cedar or redwood – rather than pressure treated lumber which contains heavy metals, like arsenic, that may be harmful to your chicken’s health. The open-air run should be covered with chicken wire (metal mesh) on all sides to prevent predators from entering.
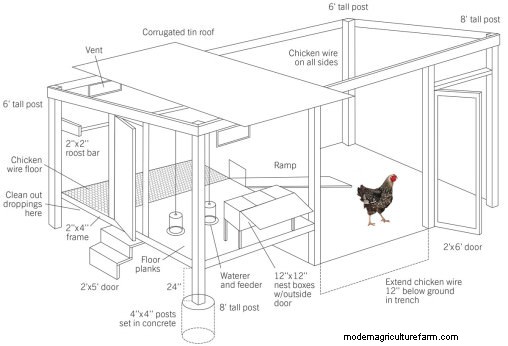
Click to enlarge. Illustration by Susan Huyser
The interior of the run needs nothing more than a thick layer of straw over the ground to absorb chicken droppings and moisture when it rains. A watering device may also be hung from one of the rafters (by bailing wire attached to a nail) so the birds can drink when they’re outside during the day. (The base of the waterer should be 6 to 8 inches above ground level.) If the run does not receive shade during the hottest hours of the day, add a layer of shade cloth on top of the chicken wire ceiling. Build a gently sloping ramp at least 8 inches wide from the ground level up to the platform for the enclosed area. Before this area is enclosed, outfit it with the following items:
Locate the nest boxes along the front wall at least 24 inches above the floor. These can be as simple as wooden shelves with plywood dividers that are filled with straw. Add a 2-inch piece of wood across the front of the boxes to keep the straw from spilling out. There are also prefabricated nest boxes available, though some chicken keepers use plastic kitty litter boxes for nests because they are easy to remove and clean periodically. The roosts should be positioned higher than the nests. Chickens are descended from tree-dwelling jungle fowl and will always seek out the highest point to sleep (and the nests will quickly become soiled if the chickens use them for roosting).
Now is the time to add a roof and walls to enclose the nesting and roosting area. Any weatherproof material may be used, but tin is an easy, yet fashionable, choice for the roof, and wood siding makes a quaint exterior for the walls. (Additional 2Á—4 framing will be necessary for the walls and roof structure.) When you build the walls, make sure to plan for easy access to collect eggs and clean the coop. All access points should be lockable with raccoon-proof latches – a typical gate latch with a carabiner in the turnbuckle is usually sufficient to foil these masked bandits.
Plan for access on three sides:
The three types of access doors may be constructed with a simple 2Á—2 frame in the same fashion as the main entry gate to the chicken run. Instead of covering them with chicken wire, use the same material that was used for the exterior of the coop. (No anti-sag kit will be needed in this case.)
Ventilation is extremely important in summer. The chicken door and the portion of the floor covered with wire mesh will allow air in from below, but there are also needs to be a place for hot air to exit at the top. Either leave space between the eaves of the roof and the top of the walls or cut vents near the top of the walls. In either case, makes sure these spaces are covered with chicken wire to keep critters out.
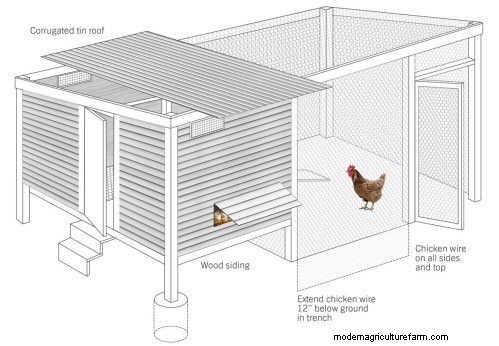
Click to enlarge. Illustration by Susan Huyser
These are the basics of a functional coop, but feel free to customize it and glorify it any way you like. Ornate trimwork, gaudy knick-knacks, and colorful artwork are all par for the course in the world chicken coop décor.


