
Welcome to Modern Agriculture!

Keeping your chicken coop clean is the first step toward a healthy, thriving backyard flock. When waste accumulates, bacteria thrive and ammonia fumes can damage feathers, leading to disease and decreased egg production. A simple, yet powerful solution is a droppings board.
Essentially, a droppings board is any surface placed under the roosting bars that captures nightly droppings. It should be easy to remove or clean, allowing you to empty the board every morning and keep the coop hygienic.
By removing waste daily, the board keeps litter fresh, reduces ammonia buildup, and stops harmful bacteria from forming.
Neglected droppings can emit ammonia, increase moisture, and attract pests—conditions that compromise chicken health. Droppings boards provide:
Keeping droppings off the coop not only keeps hens cleaner but also prevents flies, rodents, and mandible wear from self‑imposed self‑propulsion through litter.
Daily scrapes of the board let you spot abnormal poop—diarrhea, blood, or worm eggs—earlier, giving you the chance to address health issues before they spread.
Daily removal of droppings is especially important in winter. Moisture from waste can freeze on combs and feet, causing frostbite. A clean board keeps the coop’s micro‑climate stable and preserves litter life.
Droppings boards come in many materials:
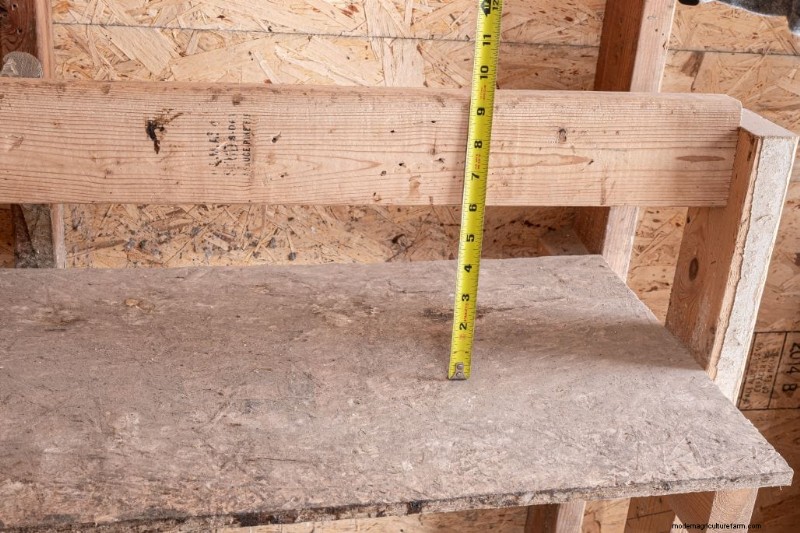
Placement matters. For most roosts, install the board 8 inches below the bars and extend 6–8 inches beyond the roosts. This ensures droppings slide onto the board without disturbing the hens.
Common designs:
Need something quick? Try:
How you clean depends on design:
Scrape dry droppings off the board. Wet or soft droppings can be doused with a small amount of sand or dirt to loosen them before scraping. Litter‑filled boards require sifting; replace litter as needed.
Remove the board weekly or monthly for a full clean. Hose it down, apply disinfectant, or replace it annually if it’s plastic or wood that degrades.
Sprinkle Coop Conditioner or a bundle of fresh herbs on the board to neutralize ammonia. Herbs also add a pleasant scent.
Frozen droppings can be hard to scrape. Wait until temperatures rise before cleaning. Litter‑filled boards can still be sifted out.
Droppings boards are a simple, cost‑effective upgrade that protects flock health, boosts egg yields, and eases daily maintenance. By building a board from reclaimed or inexpensive materials, you’ll enjoy a cleaner coop and happier hens.
Alexa Lehr grew up raising poultry and now runs Black Feather Farm, breeding heritage chickens. Her expertise informs her blog, The Pioneer Chicks, where she shares practical tips to improve chicken welfare.


